
FIRElood Pyrography Kit – my honest take after 6 weeks
ok so my old burner died in june right before a craft fair i had signs promised for lol. grabbed this one bc of the reviews, wasnt the cheapest but wasnt the most expensive either. been using it like 6 weeks now so figured id actually write down what i think instead of just leaving a star rating.
first thing you notice is its a wire tip, not the thick brass point like my old one. took some getting used to honestly. brass tips take forever to heat up so you kinda plan around that without realizing it. this one’s almost instant which threw me off — burned one board way darker than i wanted the first week bc i wasnt ready for how fast it reacts.
theres a dial on the base for temp. low = light shading, higher = dark solid lines. no more waiting around switching between the two which tbh was the whole reason i bought it.
pen’s lighter than i thought it’d be from the pics. my hand doesnt cramp doing signs for a couple hrs straight anymore, that used to be a real issue with my last one.
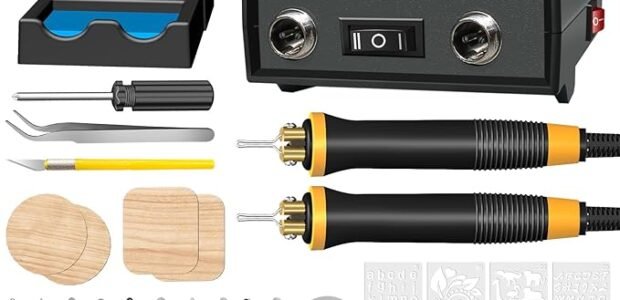
Kit comes with a few tips – one for fine lines, a flat one for shading, and a stippling one i still havent really figured out lol. also a little stand for the hot pen and a sponge thing for wiping the tip.
Not gonna lie, if youve NEVER touched a burner before this probably isnt the one to learn on. a basic single temp pen is fine for that. this makes more sense once you already know the basics and just want more control. good for wood slice signs, leather stuff, that kinda thing.
Stuff I learned the hard way:
– sand your wood first. skipped it once on a rough piece thinking itd be fine, burn came out patchy and kept snagging the tip
– dont press down harder for darker lines, i did this without thinking week one and bent a tip. slow the pen down or turn up the heat instead, same result, doesnt wreck the nib
– clean the tip on the sponge more than feels necessary. carbon builds up way faster than you think and you wont notice till your lines start looking off
questions i had before buying (in case anyone else is wondering same):
is it different from the thick soldering iron style ones? yeah — those hold heat forever which is good for thick dark lines but bad for switching to detail work quick. this one switches almost instant.
works on stuff besides wood? used it on leather so far by turning the heat down. havent tried gourds or cork yet, might update this if i do.
is changing tips annoying? not really once youve done it once. turn it off, ACTUALLY wait for it to cool not just “seems cool” (learned that one the hard way too), unscrew with the tiny screwdriver in the box, swap it, screw back in. maybe 2 mins tops.
anyway thats about it. not a perfect tool but for what i paid it’s done everything i needed so far. will edit this if anything changes.
more project ideas here if anyone wants: gift and craft ideas