
KERNOWO Wood Burning Kit: Complete All-in-One Pyrography Set for Beginners
If you’ve been searching for a wood burning kit that includes everything in one box, the KERNOWO All-in-One Wood Burning Kit is built exactly for that. Instead of buying a pen, tips, stencils, and transfer paper separately from different sellers, this kit bundles the full pyrography setup into a single zippered case — so you can start burning your first design within minutes of opening it.
This KERNOWO wood burning kit is designed specifically with beginners, hobbyists, and gift-makers in mind, making it one of the more practical all-in-one pyrography sets currently available for people new to the craft.
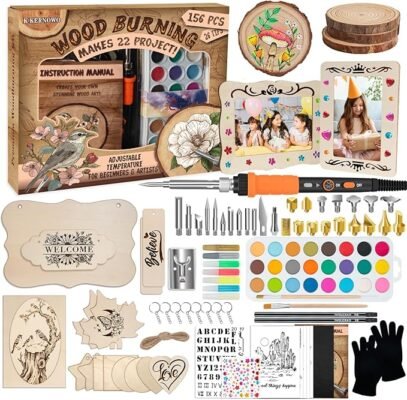
What’s Included in the KERNOWO Wood Burning Kit
- Adjustable-temperature burning pen: A built-in heat dial lets you control the temperature based on wood type and the effect you want — lighter shading needs less heat, while deep line work needs more.
- Interchangeable brass tips: Multiple tip styles cover broad shading, fine line detail, calligraphy strokes, pointillism, and stencil or lettering work.
- Letter and number stencils: Useful for names, dates, and quotes without freehanding every character.
- Carbon transfer paper: Lets you trace a printed design directly onto the wood surface before burning.
- Sample wood pieces: Scrap boards meant for testing heat settings and tip behavior first.
- Heat-resistant handle and metal stand: Keeps the grip cool during long sessions and gives the hot tip a safe place to rest.
- Zippered carrying case: Keeps every tip and accessory organized in one place.
Who the KERNOWO Wood Burning Kit Is Best For
This kit is best suited for beginners and hobbyists starting pyrography for the first time, as well as anyone making a one-off personalized gift. Common projects include:
- Personalized cutting boards
- Custom wooden spoons
- Rustic wooden signs
- Decorative wood slices
- Leather embossing (using the lower heat range)
Advanced pyrography artists working on large-scale or highly detailed pieces may eventually want a higher-wattage, more precise standalone burner. But for learning the craft, the tip variety included here covers most beginner and intermediate techniques.
Tips for Getting the Best Results
- Let the tip fully heat up before starting — brass tips need a couple of minutes to reach a stable temperature.
- Use pliers to swap tips, not your fingers, since the metal gets hot and expands.
- Test on scrap wood whenever you change tips or adjust the heat dial, since different combinations burn differently.
- Match heat to wood hardness — oak and other hardwoods need more heat than pine or basswood.
- Slow down for darker lines instead of only increasing the temperature.
Frequently Asked Questions
Is the KERNOWO wood burning kit good for beginners?
Yes. It comes with stencils and transfer paper that make it easy to trace designs before burning, so beginners don’t need freehand drawing skills to get started.
Can this wood burning kit be used on leather?
Yes. With the temperature dial turned down, the smooth tips can be used to emboss leather wallets, belts, and similar materials.
Why isn’t the pen burning the wood dark enough?
Increase the temperature slightly or move the pen more slowly across the surface. Hardwoods such as oak require more heat than softwoods like pine or basswood to reach the same darkness.